Loaded Sweet Potato with Cilantro Lime Cream by Craig Montague

Blah Blah Blah Potato!!

Briana Riddock

Give that boring Idaho potato a break this week and trade it in for a bright orange sweet potato. This sweet starch is a good alternative for your carbohydrate fix during the week. Pop it in the oven right when you get home as you spend time to decompress from the day. Within an hour load your potato with fresh goodies!

loaded_potato-1.jpg

For those that do not eat pork, you can substitute the ham for beef or turkey sausage. However, it’s always heaven when brown sugar and pork link up! Cooking the ham in the brown sugar and butter gives it an amber caramelized color and an added note of sweetness.

This recipe is a guideline, not the rule. You can mix and match whatever toppings you prefer, but make sure you always have a fresh element to balance out the sweetness of the potato. I wanted to add fresh jalapeño, but I forgot to pick it up when I was at the grocery store!

loaded_potato-4.jpg

The cilantro lime cream brings a tangy earthy tone and is used as a topping. You can also make this cream and dollop on tacos or fajitas. I chose red onions because the bite is far less abrasive than a yellow or white onion. Red onions are slightly softer in pungency while green onions are even milder and refreshing.

loaded_potato-5.jpg
loaded_potato-10.jpg

Loaded Sweet Potato with Cilantro Lime Cream

Recipe Type: Easy

Cuisine: American

Author: seasoningbottle

Prep time: 15 mins

Cook time: 45 mins

Total time: 1 hour

Serves: 2

Spruce up this sweet spud with a few fresh ingredients.

Ingredients

  • 2 medium sized sweet potatoes

  • 1/2 cup cubed ham

  • 1 tablespoon butter

  • 1 tablespoon brown sugar

  • 1 garlic clove

  • 4 oz. sour cream or plain greek yogurt

  • 1/2 lime

  • 1 tablespoon fresh cilantro chopped

  • 1 green onion stalk chopped

  • 1/2 small red onion chopped

  • 2 tablespoons parmesan cheese

  • salt (to taste)

  • pepper (to taste)

Instructions

  1. Preheat oven to 400F

  2. Line baking sheet with foil or parchment paper

  3. Throughly wash potatoes removing any dirt

  4. Place potatoes on baking sheet and bake for 45 minutes – 1 hour until tender

  5. In a small saucepan saute garlic, ham, and brown sugar in butter on medium to low heat for 10 minutes.

  6. In a small mixing bowl combine sour cream/greek yogurt, juice of 1/2 lime, and fresh cilantro together.

  7. Once potatoes are soft, remove from oven

  8. Slice open the potatoes and season to taste with salt and pepper.

  9. Add remaining ingredients as toppings – green onion, red onion, parmesan cheese and cubed ham

  10. Finish with a dollop of cilantro lime cream!

Pineapple Mimosa with Caramelized Orange and Sage by Craig Montague

Blah Blah Blah Drinks!!

Briana Riddock

If you love brunch as much as I do, you will enjoy this simple upgrade of caramelized orange slices to the afternoon breakfast classic. The most work that has to be done is baking the orange slices to caramelized perfection. I wanted to incorporate a fresh woodsy herb, and sage was the best to pair with citrus. I had a specialty cocktail at a swanky New York bar that featured sage oil! That gave me the inspiration to add sage to my version of the pineapple mimosa. Wedding season along with the warmth of the spring is quickly approaching. If you are hosting a bridal shower or baby shower, consider serving this pineapple mimosa for the intimate occasion.

pineapple_mimosa0216-1.jpg
pineapple_mimosa0216-3.jpg

The color of the mimosa starts to change to a darker amber color the longer it soaks with the orange. The burnt sugar from the orange adds a slight butterscotch flavor. By baking the sage along with the orange, it allows the sage flavor to be infused into the orange. Guests at  your brunch party will be completely astonished and impressed by the sophistication that the sage and orange add. Traditionally, dried sage is used to ward off evil spirits by burning it throughout your home! It has multiple purposes outside of the kitchen. If you cannot find fresh sage in your local grocery, you can substitute it with with rosemary or thyme

pineapple_mimosa0216-5.jpg

Pineapple Mimosa with Caramelized Oranges and Sage

Recipe Type: Drinks

Cuisine: Cocktail

Author: seasoningbottle

Prep time: 8 mins

Cook time: 15 mins

Total time: 23 mins

Serves: 6

This pineapple mimosa is the way to go for your next brunch with friends and family. The touch of burnt sugar from caramelized oranges add a deeper sweet taste.

Ingredients

  • 2 cups pineapple juice

  • 1 bottle of champagne, chilled

  • bunch of fresh sage

  • one orange

  • 4 tablespoons brown sugar

Instructions

  1. Preheat oven to 400F.

  2. Cut orange into 1/4 inch slices and place on a cookie sheet. It would be wise to line your cookie sheet with parchment paper for easy clean up.

  3. Add 1-2 leaves of sage on each orange slice and sprinkle with evenly with brown sugar.

  4. Bake oranges for 10 minutes and flip. Bake for an additional 5 minutes until dark golden color. Sage leaves may fall off when you flip the orange slices, but its ok!

  5. Remove orange slices from oven and allow to cool.

  6. In a large pitcher combine pineapple juice and champagne.

  7. Place an orange slice in each champagne fluke. Pour mimosa over orange slices.

  8. Garnish with additional sage leaves.

Red Velvet Cake with Chocolate Cream Cheese Frosting by Craig Montague

Perfect for Valentine’s Day or any of the other 364…

Briana Riddock

Red Velvet Cake is a southern classic that is served every Thanksgiving and Christmas at my family’s dinner table. It is tradition to order it from our local Piccadilly’s because they have the best version that we love! Their red velvet cake features three layers of cake with cream cheese frosting and is covered in pecans. For some reason, we never baked the cake ourselves. I thought it was important that I know how to make this classic cake for myself. I found this recipe from another blogger, Bakerella, which has been the best recipe I’ve tried. It includes buttermilk and vinegar, which gives the cake a subtle, tangy flavor. I wanted to give regular cream cheese frosting a slight facelift by adding cocoa powder to complement the cocoa in the cake.

I found varying stories of where red velvet cake originated, and it’s not as southern as I thought. Many fingers point to the Waldorf Astoria as the birth parent in the 1930s. Adams Extract Company capitalized on the similar recipe of Mahogany Cake and made it popular by adding its vanilla extract and red food coloring. Beet juice also attributed to the red color as a source of sugar during World War II sugar rations. It did not start to pop up on southern tables until the 1950s. For more details about the origins of Red Velvet cake, check out the New York Times article where I sourced my information.

red_velvet_cake-3-of-10.jpg

The original recipe called to bake at 350F, but I find that the edges burn quicker than the inside with dark pans. Depending on the darkness of your baking pan, I would recommend baking at a lower temperature–around 335F for a slightly longer time to prevent the outside from baking faster than the inside.

red_velvet_cake-5-of-10.jpg

I chose to decorate my cake with walnuts and assorted fruit. Typically, red velvet cake is topped with pecans, but walnuts were a less expensive option so I went with that. I made an arrangement with strawberries, blueberries, and kiwi. I started with arranging the strawberries first and built the sliced kiwi around it. I used a potato peeler to peel the kiwi to get an even, circular shape. Lastly, I added blueberries randomly around the strawberries and kiwi. The shine of the fruit came from a glaze of melted apricot preserve with water that I slightly heated and brushed over the fruit.

I love the look of shaved chocolate on cakes. I shaved a chocolate bar with a potato peeler to get the chocolate curls. I learned this tip from a bakery I worked at in Atlanta called Maison Robert Fine Chocolates that specializes in French pastries. If you are ever in the city check it out!

I hope you enjoy this recipe and decorating tips!

red_velvet_cake-7-of-10.jpg

Jamaican Escovitch Red Snapper by Craig Montague

escovitch-5.jpg

Blah Blah Blah Fish

Briana Riddock

As a child, my mom sent my siblings and I to Jamaica for summers. Aunt Judy’s house is where we stayed. As soon as I stepped foot into her driveway, the sweet aroma of mangoes from the trees outside floated around me. Aunt Judy was never an avid cook but, her kitchen was filled with cooks. 

escovitch-1.jpg

I saw Escovitch Fish prepared for the first time when my aunt’s friend brought over fresh snapper to fry for us. Seasoned with spices, she put the whole fish in a frying pan filled with oil. The oil bubbled around the fish as she added the scotch bonnet peppers. The air immediately filled with a pungent peppery smoke. Afterwards she sauteed the peppers and onions with vinegar to make the warm pickle. The fried fish laid flat on a layer of paper towels soaking up the oil. The fish were transferred to plates and smothered with the pickled peppers. Escovitch Fish is a classic Jamaican dish that I love preparing. I’ve officially become an expert at maneuvering around those tiny fish bones.

escovitch-3.jpg

When we traveled from Kingston to Ocho Rios, I remember grabbing food from street merchants. We stuck our hands out the car to buy bags of guinep, peppered shrimp, mangoes, and coconut water. Guinep is a peculiar fruit. I snapped the leathery skin open to reveal a pulpy flesh reminiscent of lychee with notes of a sweet and sour. The fruit was mostly seed, so we devoured a bag quickly. It was the perfect snack for traveling cross country.

escovitch-4.jpg

Roads were narrow, filled with potholes, and the drivers drove fearlessly around mountainsides. We ventured through Fern Gully, a magical winding road covered in thick fern that was once a river. The sun rays bounced everywhere as it peaked through the greenery. When we reached the Ochie, we made a stop at Dunn’s River Fall, the most popular waterfall in Jamaica. I would grab the hands of my brother and sister, while the fresh water gushed over our faces as we climbed the slippery waterfall rocks. Memories of Jamaica will always make it my piece of paradise.


Jamaican Escovitch Red Snapper

Author: seasoningbottle

Ingredients

  • 4 medium sized fresh Red Snapper, scaled and clean

  • 1-2 scotch bonnet peppers

  • 10-15 pimento seeds/ allspice seeds

  • 1 large white onion, thickly sliced

  • 1 red bell pepper, cut lengthwise ½ inch wide

  • 1 green bell pepper, cut lengthwise ½ inch wide

  • 1 carrot, grated

  • 1 lemon

  • ½ cup rice wine vinegar

  • 1 tablespoon sea salt

  • 2 teaspoons cracked black pepper

  • 1 teaspoon paprika

  • 1 teaspoon onion powder

  • 1 teaspoon garlic powder

  • ½ teaspoon celery powder

  • ½ teaspoon cumin powder

  • Canola or Vegetable Oil

  • Cooked Jamaican style rice and peas – Optional

Instructions

  1. Rinse and clean fish with juice from lemon. Pat dry. Cut 3 diagonal lines across the sides of each fish.

  2. Mix spices sea salt, cracked black pepper, paprika, onion powder, garlic powder, celery powder, and cumin in a small bowl.

  3. Season the outside and inside cavity of the fish with the spice mix.

  4. Fill a large frying pan with oil, about ½ inch deep, to high heat.

  5. Season the oil by adding 6-8 pimento seeds and ½ of the scotch bonnet pepper (or a whole pepper for a more intense heat) into the oil. The scotch bonnet pepper will eventually turn black as it cooks. That’s ok!

  6. Place fish in the frying pan away from you. Adjust the heat between medium and high to avoid the fish being burned.

  7. Fry for 5-6 minutes on each side. The fish should be slightly brown to blackened.

  8. Remove fish from frying pan and allow to drain on a plate lined with paper towels.

  9. Allow oil to cool and strain, reserving ½ cup of oil. Discard remaining oil.

  10. In a large sauce pan, warm reserved oil to medium heat. Add fresh oil if needed.

  11. Add onions, remaining allspice seeds, red pepper, green pepper, carrot, and remaining scotch bonnet pepper to lightly saute.

  12. Saute for about 5 minutes, you want the vegetables to keep their body and crunch.

  13. Add the vinegar, and cook for another 5 minutes.

  14. Place onions and pepper sauce over the fish.

  15. Serve with Jamaican Rice and Peas.

Honey Balsamic Chicken Wings [with video]! by Craig Montague

IMG_6493.jpg

Blah Blah Blah Wings!!

Briana Riddock

Sometimes I crave wings. I am a classic buffalo kind of gal, but I was not in the mood to have my mouth scorched because of my extra spicy taste. I was in the mood for something sweet, tangy, and savory. “Balsamic reduction” always seems to have this fanciful allure that extra effort was made to create this molasses-like sauce. However, since it is literally allowing balsamic vinegar simmer until it reduces in size without burning it next to nothing and without burning up your pot. The key is to keep a watchful eye. (Not the over obsessive eye, but a regular check in is cool.) The sweetness of the honey mellows out the pungency of the vinegar and the pinch of salt balances both flavors. If you want an extra kick, please feel free to add Sriracha sauce!

I invited my best friend Craig over to help me shoot the video (which is posted below!) for this recipe. Afterward, we sat in the kitchen and tore those wings up! We didn’t make a polite plate or sat neatly at the dinner table. We stood there hands sticky and our mouths filled with glaze.

Honey Balsamic Chicken Wings [with video]!

Author: seasoningbottle

Prep time: 10 mins

Cook time: 35 mins

Total time: 45 mins

This easy 2-ingredient honey balsamic sauce is a mix of sweet and tangy. The wings are baking instead of fried to achieve a similar crispy texture with less additional fat added.

Ingredients

  • 2 lbs chicken wings

  • 1 cup balsamic vinegar

  • 1/2 cup honey

  • 1/2 tablespoon salt + 1 teaspoon

  • 1 teaspoon garlic powder

  • 1/2 teaspoon paprika

  • 1 teaspoon black pepper

  • 1 tablespoon sriracha sauce (optional)

Instructions

  1. Preheat oven to 375 F.

  2. Clean and dry chicken

  3. In a large mixing bowl, season chicken with salt, garlic powder, paprika, and black pepper.

  4. Arrange chicken wings on an oven safe roasting/cooling rack and bake for 20 minutes. If you do not have a roasting/cooling rack, line a flat baking pan with foil and lightly coat with oil to prevent sticking.

  5. In a medium sauce pan, bring the balsamic vinegar, honey, and salt together to a low simmer. Simmer for 15 to 20 minutes until the vinegar has reduced in volume and thickened. (Add the sriracha sauce if you would like a little spicy kick.)

  6. Remove chicken from the oven, flip, baste with the balsamic glaze, and bake for another 15 minutes.

  7. The chicken will be crispy and golden brown. Toss the wings in the remaining glaze!

Senegalese Bissap by Craig Montague

bissap5.jpg

I drink a version of bissap every Christmas season with my family and didn’t even know it. It was not until I went to a restaurant in Little Senegal, a Senegalese neighborhood in Harlem,  where I had bissap and I found a connection between my Jamaican culture and African heritage. Bissap is the national drink of Senegal and can be enjoyed at every meal. It’s floral aroma has a slight tang with citrus undertones. Commonly known as sorrel in the Caribbean or flor de Jamaica in Mexico, bissap goes by a few different names depending on which tropical climate you have it in. The deep ruby colored drink comes from a hibiscus flower native to West Africa. If you drink hot hibiscus tea in the morning, bissap is its cooler counterpart that is traditionally served cold. Bissap is simply sweetened with sugar, but it easily transforms into a spiced drink with the addition if ginger, cloves, allspice seeds, or orange peels.

When I am in New York and Atlanta I know exactly where to find dried bissap or sorrel petals. I go to any Caribbean, Latin, or African food market and I know I’ll find it. Oddly (or not so oddly), I knew exactly (well not exactly, I did a little wandering) where to find bissap here in Paris where I currently live. I headed to Chateau Rouge, a district in Paris where shoppers can find speciality products and foods from North and Sub-Saharan Africa. I roamed a few narrow streets passing hair braiding shops and seamstress shops. I found a quaint grocery store where I spotted a bag of dried bissap almost immediately, along with a few other spices I was in need of. I roamed further to discover a full market of vendors on the street selling meats, fresh produce, and roasted chestnuts charing on an open flame.

I am very excited to have this post be included in a virtual Black History Month Potluck. This potluck feature recipes from black bloggers that have unique cultural inputs to the culinary world. Be sure to check out other bloggers of color from our Facebook page – We Love Black Food Bloggers.

bissap6.jpg

Senegalese Bissap

Cuisine: African; Caribbean

Author: seasoningbottle

Prep time: 10 mins

Cook time: 20 mins

Total time: 30 mins

Serves: 8 servings

Bissap is a refreshing traditional drink from Senegal. The deep red color comes from the roselle hibiscus flower.

Ingredients

  • 2 cups dried bissap petals

  • 8 cups boiling water

  • 1 cup white sugar

  • 5 cloves (optional)

  • 10 allspice seeds (optional)

  • 3 cinnamon sticks (optional)

  • handful fresh crushed ginger (optional)

  • 4 ounces overproof white rum (optional)

Instructions

  1. When water is boiled remove from heat and add the dried bissap petals.

  2. Stir in sugar to dissolve.

  3. To make the Caribbean version add cloves, allspice seeds, cinnamon sticks, and ginger.

  4. Steep petals for 15 to 20 minutes and strain with a fine mesh strainer.

  5. Add overproof white rum to spike the drink!

  6. Chill in the refrigerator overnight and serve cold.

Check out the other bloggers in the Black History Month Virtual Potluck:

Meiko and the Dish | Crispy Fried Chicken with Pepper Jelly Molasses

Whisk It Real Gud | Trinidad Oxtail Pelau

Raised on Ramen | Caramelized Plantain Tacos with Pecan-Honey Butter

Dash of Jazz | Aunt Georgia’s Peach Cobbler

Foodie In New York | Twice Baked Yams

Chef Kenneth | Smothered Okra with Shrimp

Savory Spicerack | Po’ Boys with Cajun Tempura Shrimp

Chocolate For Basil | Groundnut Stew (Peanut Stew)

Simply LaKita | Banana Pudding

My Forking Life | Callaloo and Saltfish

Gucci Belly | Swamp Water

Kaluhi’s Kitchen | Ukwaju (Tamarind) Marinated Spicy Chicken Thighs

Sweet Savant | Coffee-Rubbed Lamb Ribs

Salty Sweet Life | Southern Greens Shakshuka

Eat.Drink.Frolic. | Maple Roasted Brussels Sprouts

I Heart Recipes | Southern Fried Cabbage

Jehan Can Cook | Mango Turmeric Smoothie

Margarita’s On The Rocks | Lemon Pepper Fish Tacos with Collard Green Slaw

A Soulful Twist | Slow-Cooker Gumbo (Gluten Free)

The Kitchenista Diaries | Coconut Milk Braised Collard Greens

My Life Runs On Food | Orange Chocolate Smoothie

Butter Be Ready | Skillet Cornbread

Domestic Dee | Shrimp Creole

D.M.R. Fine Foods | Curry Chicken Pot Pie

The Inner Gourmet | Lamb Fried Rice

Marisa Moore Nutrition | Hoppin’ John Patties with Warm Tomato Salsa

The Hungry Hutch | Blood Orange Cornmeal Cake

Sweet Cornbread with Lavender Syrup by Craig Montague

cornbread-10.jpg

Happy Easter! It is strolling around the block weather in Brooklyn today. For those heading to brunches and loved ones houses after church this afternoon, consider adding this Sweet Cornbread with Lavender Syrup to the menu. It is an unlikely pairing, but the soothing and woodsy lavender syrup mimics what honey does for biscuits. The lavender aroma instantly fills your kitchen as the buds steep.  For a few seconds, I teleported to a Thai day spa and I was surrounded by the scent of burning lavender oil. Cornbread brings comfort. It made sense to match it with a relaxing flower.

The cornbread is subtly. I used condensed milk instead of sugar in the batter. The condensed milk adds an extra dose of milk and a little bit of sweetness. With a drizzle of the lavender syrup, it gives you the ability to control the sugar.

Fresh corn is cut right from the cob to create body and texture in each slice. I recommend baking the cornbread in a cast iron skillet to guarantee a crispy golden crust. When you cut into the corn bread you get a pillowy inside with a thin layer of crunch on the outside. If you don’t have a cast iron skillet, the cornbread can transform into corn muffins if you bake it in a muffin tins.

cornbread-3.jpg
cornbread-6.jpg
cornbread-7.jpg

If you have extra lavender syrup left, add a scoop to your morning tea or coffee. Try it on toast with ricotta cheese and lemon zest. You can use it in place of simple syrup in your favorite cocktail or sweeten plain yogurt topped with mixed berries for a midday snack.

cornbread-8.jpg
cornbread-9.jpg
cornbread-11.jpg
cornbread-14.jpg

Sweet Cornbread with Lavender Syrup

Author: seasoningbottle

Ingredients

  • 1 cup cornmeal

  • 1 1/2 cup All purpose flour

  • 1 tablespoon baking powder

  • 1/2 teaspoon salt

  • 2 eggs

  • 1/2 cup butter (1 stick)

  • 1 ear of corn, shucked

  • 1 cup of milk

  • 1/2 cup condensed milk

  • 1 teaspoon orange zest

  • 2 cup boiling water

  • 2 tablespoons dried lavender

  • 1 cup white sugar

Instructions

  1. Preheat oven to 375F

  2. In a medium (10 inch) cast iron skillet heat to medium and melt butter. Add the corn kernels to saute for about 8 minutes. Corn and butter may turn slightly golden brown as the milk solid start to cook. When the corn is cooked, pour into a heat safe bowl and allow to cool for a few minutes.

  3. Combine dry ingredients in a large mixing bowl – cornmeal, AP flour, baking powder, and salt.

  4. In another bowl, lightly beat the eggs and stir in the milk, condensed milk, and orange zest.

  5. Add the wet ingredients to the dry and mix in the corn with butter into the batter.

  6. Add the batter back to the skillet which should already be greased from the butter.

  7. Bake for 30 minutes until the crust is brown around the edge.

  8. While the cornbread is baking, steep the lavender in for 10 minutes in the boiling water.

  9. Strain the lavender tea. Pour the tea into a small sauce pan with the white sugar. Bring mixture to a boil and reduce to a low boil for 30 minutes stirring occasionally to reduce crystallization on the sides of the the pan. The mixture will reduce in volume by half. Once it thickens remove from the heat and allow it to cool for 15 minutes.

  10. Drizzle syrup over the warm cornbread!

Creamy Roasted Tomato Coconut Soup (VEGAN) by Craig Montague

tomato_soup-3.jpg

I always need a cup of soup on the days when the rain oscillates between a downpour and a slight drizzle. That type of back and forth weather automatically calls for me to have a bad hair day. And of course, these rainy days always happen during the week when I don’t have time to simmer a pot of vegetable-hearty soup on the stove for an hour or so. It’s already dark by the time I walk into the house, and all I want to do is hop into the bed. If you ever have these similar feelings, this roasted tomato soup recipe will come in handy. Within 30 minutes, you have a robust bowl of creamy tomato soup to warm your insides, while you sit in front of the TV or your laptop catching up on the latest gotta-watch Netflix series.

tomato_soup-5.jpg

The very pleasant (and healthy) aspect of this soup is that it’s vegan—and this was totally was unintentional.  I made a version on the soup before and featured it on my Instagram stories originally using heavy cream as the creamer. However—to my surprise—my DM’s were filled with people inquiring about an alternative ingredient to the heavy cream. I automatically suggested coconut milk. It gives you the creaminess that you expect in a smooth soup, but it also has its own dose of natural fats that adds to the body and thickness of the soup. Instead of reaching for the Parmesan cheese to sprinkle on top, I opted for briny capers. They add a burst of saltiness and texture.

tomato_soup-9.jpg

In preparing this soup, you will find out how easy and no-fuss it is to make. If you are not on the vegan boat, but still appreciate the recipe as-is, you can serve this creamy soup with a gooey grilled cheese sandwich or a piping hot Cuban sandwich. The soup can also accompany a leafy green salad or a grain salad. And if you are really hankering for milk fat or you are not a fan of coconut milk, go ahead and use the cream in its place.  

Creamy Roasted Tomato Coconut Soup (VEGAN)

Recipe Type: Easy

Author: seasoningbottle

Prep time: 6 mins

Cook time: 20 mins

Total time: 26 mins

Serves: 3

This creamy, vegan-friendly roasted tomato coconut soup is an easy mid-week meal to make as you come home from work.

Ingredients

  • 1 lb plum tomatoes (about 8)

  • 1 small onion, quartered

  • 3 whole garlic cloves

  • 3 tablespoons coconut oil

  • 1 teaspoon salt

  • ½ teaspoon black pepper

  • 1/2 cup coconut milk

  • 1 1/2 cups vegetable stock

  • 1/2 teaspoon thyme leaves

  • Fresh basil (about 6 leaves) or dried basil (1 teaspoon)

Instructions

  1. Preheat oven to 375 F.

  2. Cut tomatoes in thick slices and place them on a baking sheet in a single layer. Season with salt and black pepper, and drizzle over coconut oil.

  3. Add the onion and garlic cloves to baking sheet.

  4. Roast tomatoes for 15 to 20 minutes or until slightly caramelized. (Tip:Wrap the garlic in a small piece of foil with a splash of oil to prevent them from burning.)

  5. Warm the vegetable stock and coconut milk together in a separate pan or warm together in the microwave in a microwave safe bowl. Add roasted vegetables, warmed stock mixture, basil, and thyme to the blender and blend until smooth. (Be careful when blending hot liquids! You may need to open the lid halfway through blending to vent the hot steam.) You can also use a hand blender to puree the soup.

  6. Add more salt if needed. Enjoy immediately.

hello (1).png

Honey Turmeric Skillet Chicken + Black History Month Potuck by Craig Montague

turmeric-chicken-2.jpg

I became aware of the dynamic healing powers of turmeric and honey when I lived in New York, and had an annoying sniffling nose and congested chest. I was experiencing the onset of a seasonal cold because of the changing weather from the blistering summer days to chilly fall afternoons. I was determined to find an all-natural remedy to prevent my symptoms from developing into a full-fledge-in-the-bed-cold. I remember reading a fleeting Instagram post about how turmeric’s anti-inflammatory and anti-oxidant properties were good for combating the common cold.

I ran to the local grocery store to grab a bottle of the yellow spice along with a jar of honey. In my kitchen, I concocted the magical elixir, mixing the two ingredients into a thick paste. I scooped out a heaping spoonful, took a deep breath and swallowed the sticky mixture in one gulp. It was bitter and gritty, but it went down smoothly. After a few hours I took another spoonful and saved the rest for another dosage. For three days straight, I practiced the same turmeric and honey ritual. On the fourth day, I felt back to normal. After those days of experimentation, I was convinced that turmeric’s healing powers were real.

turmeric-chicken-1.jpg

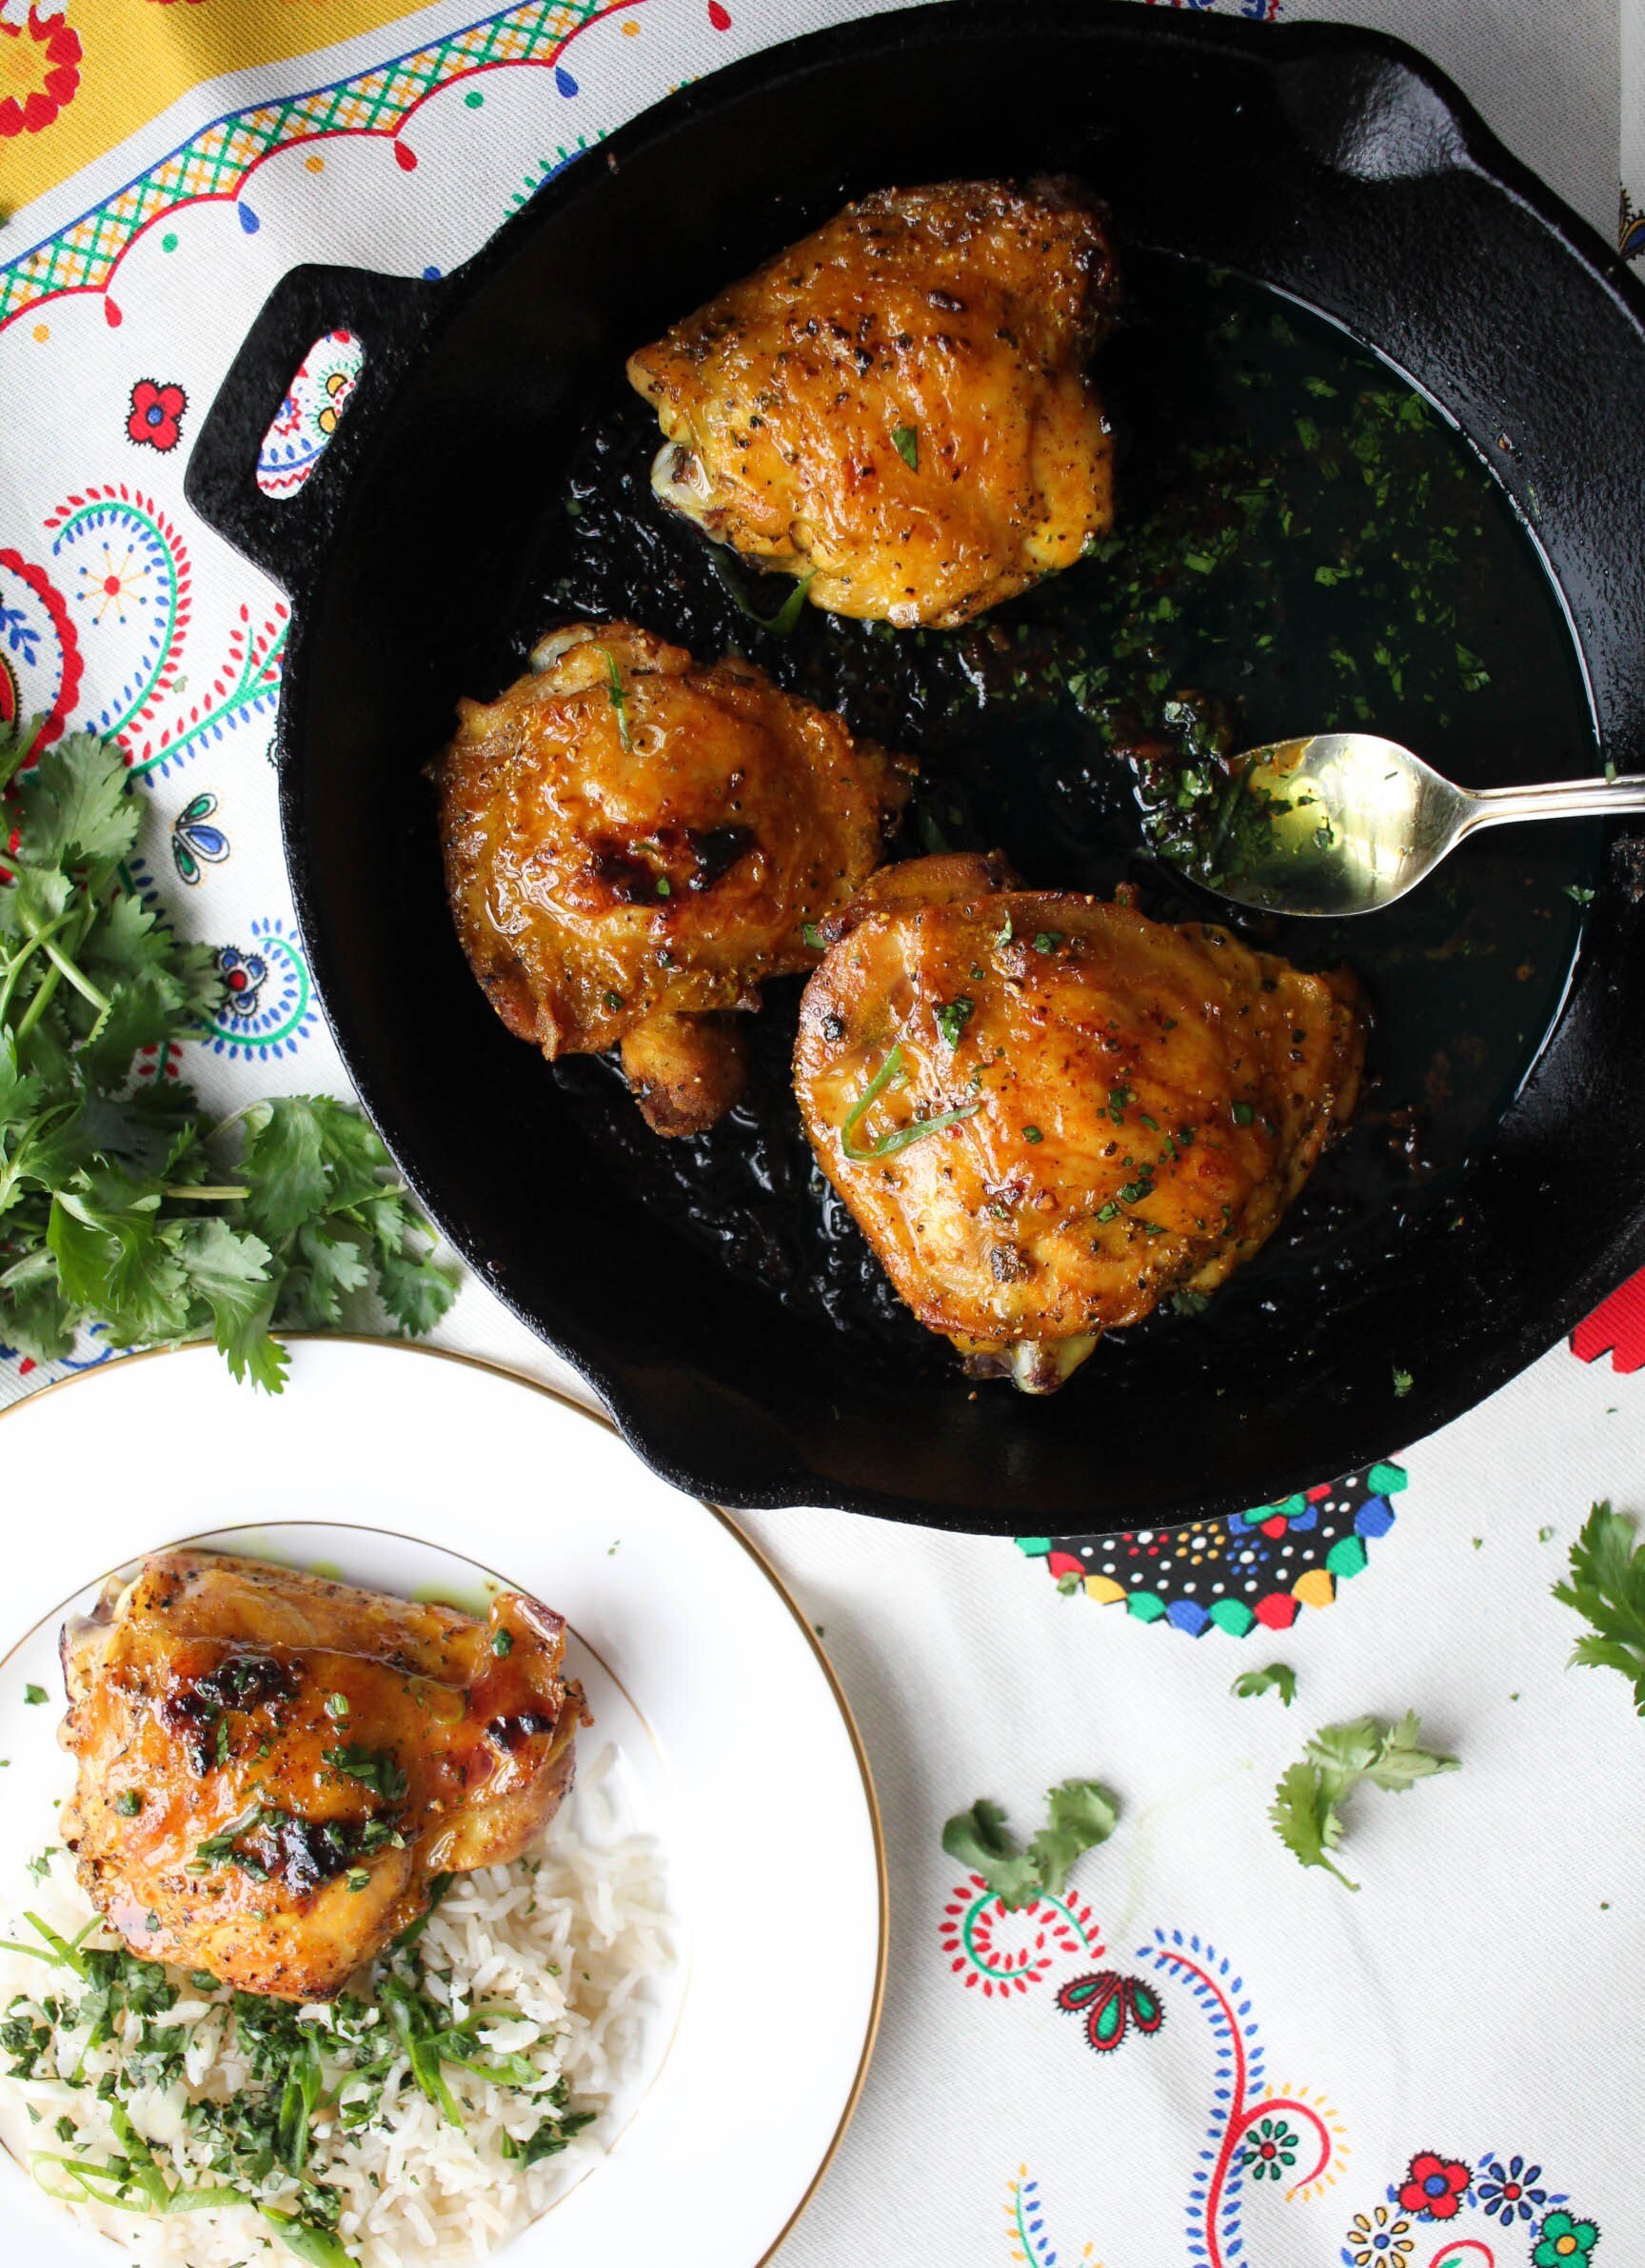
I wanted to find more creative ways to incorporate turmeric in my daily meals. It’s a bold pungent spice that can warm any dish its added to. Sticking with the basic formula of the paste, I knew it would be stellar on chicken thighs. Chicken thighs are really affordable and absorb whatever flavor it’s seasoned with. And, if you pan-sear them on the stove, you can get a very crispy crust while the inside remains juicy.

I love to utilize a cast iron skillet for this kind of recipe because it can move straight from the stove directly into the oven. This recipe is not overly fussy. The subtle coriander powder, breaks down the strength of the turmeric and it also complements the fresh cilantro used to finish the chicken. Consider this Honey Turmeric Skillet Chicken one of those easy weeknight dinner meals you are always searching for.

turmeric-chicken-4.jpg

This blog post is in partnership with 27 other talented black bloggers across the web. We all came together to celebrate Black History Month with a virtual potluck. Check out all the other bloggers and their recipes following this recipe.

Honey Turmeric Skillet Chicken

Author: seasoningbottle

Prep time: 3 mins

Cook time: 22 mins

Total time: 25 mins

Serves: 4

Ingredients

  • 1 1/2 – 2 lbs chicken thighs, bone in, skin on (about 4-5 pieces)

  • 1 1/2 teaspoon turmeric powder, divided

  • 1 ½ teaspoons sea salt

  • ½ teaspoon freshly cracked black pepper

  • 1/4 teaspoon coriander powder

  • 2 tablespoons coconut oil

  • 2 ½ tablespoons honey

  • 1 tablespoon fresh cilantro, chopped

  • juice of ½ lemon

Instructions

  1. Preheat oven to broil high.

  2. In a large bowl, season chicken with 2 teaspoons turmeric, sea salt, freshly cracked black pepper and coriander powder.

  3. Bring a heavy-bottomed skillet to medium-high heat and add coconut oil. Arrange the chicken skin-side down in the skillet. Cook for 8 minutes, or until the skin is golden brown. Flip and cook for another 6 minutes.

  4. In a small bowl, mix remaining ½ teaspoon turmeric and honey. Flip chicken again and spoon honey mixture evenly over the chicken skin. Broil in the oven for 5 minutes or until the honey has caramelized. Sprinkle the cilantro and squeeze juice of lemon over chicken to finish. Season with additional salt to taste.

Beautiful Eats & Things | Turkey Sausage Stuffed Collard Green Wraps

Better With Biscuits | Fresh Corn Pudding

Beyond The Bayou Food Blog | Creole Seafood Courtbouillon

Brandi’s Diary | Better than Jiffy Cornbread from Scratch

Butter Be Ready | Southern Style Mac and Cheese

Chef Kenneth | Fried Sweet Potato Hand Pie

Chocolate For Basil Pilau and Kachumbari (Spiced Rice with Pico)

Cooks with Soul | Braised Short Rib Meatloaf

D.M.R. Fine Foods | Cinnamon Raisin Bread Pudding with Maple Glaze

Dash of Jazz | Nigerian Jollof Rice

Domestic Dee | Fried Peach Pies

Eat.Drink.Frolic. | Olive Oil Braised Collard Greens

Food Fidelity | Mofongo Relleno (Mashed Plantains with Garlic Shrimp)

Food is Love Made Edible | Buttermilk Biscuits with Fried Chicken and Tabasco Honey

High Heels and Good Meals | Crawfish Etouffee

HomeMadeZagat | Shrimp with Spicy Curry Cream Sauce

Houston Food Fetish | Sweet Almond Tea Cakes

In the Kitchen w/Kmarie | Pineapple Lemonade

Marisa Moore Nutrition | Bourbon Peach Glazed Salmon

Meiko and The Dish | Candied Bourbon Peach Cobbler

My Life Runs On Food | Lentil Soup and Roast Okra

Orchids + Sweet Tea | Carrot and Zucchini Noodles Stir Fry with Shrimp

Raised on Ramen | Orange Glazed Brussels Sprouts

Savory Spicerack | Creamy Seafood Stew

Simply LaKita | Blackberry Cobbler

The Hungry Hutch | Orange Bundt Cake with Vanilla Glaze

The Kitchenista Diaries | Smothered Turkey Wings

Coconut Mojito by Craig Montague

IMG_9882.jpg
 Jelly jars I clean and saved. 

Jelly jars I clean and saved.

IMG_9601.jpg
IMG_9607.jpg

It has been raining in New York and I can only think about the summer days that recently left us for the cooling fall days. I choose a favorite drink every summer and this year it is a coconut mojito. Since there are a few warm days mixed in with gusty chilly days, I figure I could get away with a tropical drink for a week or so longer. The mojito is a traditional Cuban drink that consists of mint leaves, lime, white rum, and sugar. I used a Jamaican white rum from the company J. Wray and Nephew. If you do not chest hairs man or woman this rum will give it to you. It is a powerfully 63 percent proof liquor. A shot of this rum straight is for the daring and crazy. Anytime my mother or family visited Jamaica they toted back a bottle of this rum from the duty-free shops in the Jamaican airport. (PS – Feel free to use less rum! I proportioned it for this recipe but it’s still a high proof rum!)
IMG_9614.jpg
IMG_9624.jpg
IMG_9630.jpg
IMG_9654.jpg

The lime brings out the brightness of the mint and gives you a tangy tickle on your tongue. The recipe calls for 2 tablespoons of simple syrup that you can make ahead of time. It is a 1 parts water to 1 parts sugar ratio. I warmed water in the microwave and melt in the sugar. Most recipes call for you to boil the mixture in a saucepan and cool.  

Pouring in simple syrup. 

Pouring in simple syrup.

I used the end of my wooden spoon to muddle the lime, mint, ice cubes, and simple syrup. 

I used the end of my wooden spoon to muddle the lime, mint, ice cubes, and simple syrup.

IMG_9778.jpg

I went to Thailand over the summer with a group of my close girlfriends. We had constantly had coconuts in our hands. How beautiful is it to drink straight from a coconut without the worry of high fructose corn syrup, preservatives, harmful additives, and salts. I thought the coconut flavor was an appropriate spin for this drink. Coconut water should be available in your grocery store. I love the cans that have actual coconut flesh in it. Tiny bits of coconut adds a juicy caviar texture to the drink.  

IMG_9800.jpg
IMG_9882 (1).jpg
I found these cute wooden spoons in a Thailand market. 

I found these cute wooden spoons in a Thailand market.

Coconut Mojito

Cuisine: Cuban drink

Author: seasoningbottle

Prep time: 5 mins

Cook time: 5 mins

Total time: 10 mins

Serves: 2

Summer is over but we can still enjoy this mint and lime drink into the fall season

Ingredients

  • 12 mint leaves

  • 1 lime cut into wedges

  • 2 tablespoon simple syrup

  • 1/2 cup coconut water

  • 2 tablespoons Jay Wray & Nephew White Rum (63% proof)

  • -or- substitute for lighter proof white rum

Instructions

  1. In a jar muddle mint leaves, juice of lime, and lime wedges together.

  2. Add simple syrup and ice. Muddle together.

  3. Pour in coconut water and rum and stir with spoon.

  4. Garnish with additional mint leaves.

Love,

Briana

Braised Guava Short Ribs by Craig Montague

guava-beef-short-ribs-seasoningbottle-7.jpg

I dusted off my camera to make this post because the last time that I blogged was around this time last year. A lot of things have changed and now I’m back in the city where The Seasoning Bottle was born—Atlanta. My enthusiasm for creating recipes is renewed and I’m thrilled to connect with my readers again. It’s even more exciting that I’m kicking off this new recipe for my Braised Guava Short Ribs as part of the 3rd Annual Digital Black History Month Potluck with a group of 27 other talented black bloggers.

guava-beef-short-ribs-seasoningbottle-2.jpg

I thought short ribs would be the perfect rich and cozy recipe to develop for the chilly weather. Short ribs are a tough cut of beef that cannot be rushed when preparing; it needs time to simmer in its cooking liquid in order to become fall-off-the-bone tender. I recently made short ribs at a dinner party that I hosted and when I was ready to serve, to my dissatisfaction, they were not as tender as I’d hope. I realized the oven was set too low when I put them in after baking a cheesecake which requires a low and slow cooking process. I popped them back in the oven, jacked up the heat and baked them to tender perfection. I learned my lesson and I’m here to give you the short ribs gospel.

guava-beef-short-ribs-seasoningbottle-4.jpg

My short ribs include the usual suspects that you see in a short ribs recipe such as red wine and beef broth, however, I wanted to make my version different with the addition of sweet and smoky notes. Guava paste is guava pulp, sugar and water processed into a sticky pliable block that can be found in most Caribbean or Latin sections at the grocery store. It brings sweetness to the ribs in a similar fashion to a sweet barbecue sauce. Ancho chili powder gives the dish the best of both worlds; it brings heat and smokiness to balance the sweetness. Lastly, a splash of vinegar at the end ties everything together.

Braised ribs are great to make ahead of time during the day to reheat and serve later at night for dinner. If you are wondering about sides, I think something super starchy such as mash potatoes and a pot of white rice would be an excellent match. But please, this is not something you can make last minute, don’t get yourself into a jam by not properly planning to the amount of time needed to make these delicious ribs.

guava-beef-short-ribs-seasoningbottle-3-1.jpg

Black Blogger Love

Here are all the bloggers and their recipes that contributed to the potluck. Be sure to check them out. There are a few classic favorites amongst the bunch.

Beautiful Eats & Things | Okra, Corn, & Tomato Chicken Stew /// Beyond The Bayou Blog | Mackerel Balls With Biscuits & Cane Syrup/// B Sugar Mama | Red Beans and Rice/// Butter Be Ready | Caribbean- Curry Goat with Rice and Peas/// Cooks with Soul | Boudin balls/// D.M.R. Fine Foods | Spice Roasted Chicken/// Dash of Jazz | Soul Food Power Bowl/// Dish it with Tisha | Jamaican Curry Chicken/// Domestic Dee | Chicken Sliders/// Eat.Drink.Frolic. | Bourbon + sweet potato pie/// First and Full | Homemade Peach Pie/// Food Fidelity  | Nashville Hot Shrimp Sandwich/// Food is Love Made Edible | Smothered Okra with Chicken and Smoked Sausage/// Foodie In New York  | Chess Pie/// Immaculate Bites | Pimento Cheese/// Kaluhi’s Kitchen | Pilipili & Rosemary marinated mbuzi choma with Kachumbari/// Kenneth Temple | Chicken & Sausage Gumbo/// Marisa Moore Nutrition | Sweet and Spicy Roasted Cabbage/// Meiko And The Dish | Hot Buttered Rum Biscuits/// My Life Runs On Food | Southern Style Caesar Salad/// Rosalynn Daniels | Osso Bucco/// Savory Thoughts | Haitian Patty/// Simply LaKita | Fried Okra/// Sweet Tea & Thyme | Spiced Peach Shortcakes/// That Girl Cooks Healthy | Scotch Bonnet Pepper Sauce/// The Hungry Hutch | Cornbread Dressing/// Whisk It Real Gud | Banana Bread

guava-beef-short-ribs-seasoningbottle-5.jpg

Braised Guava Short Ribs Recipe

Serves: 4 /// Prep time: 30 minutes /// Cook time: 2 hours 30 minutes /// Total time: 3 hours

Ingredients:

  • 2 pounds short ribs

  • 2 teaspoons salt + more to taste

  • 3 tablespoons vegetable oil

  • 2 cups red wine

  • 1 cup beef broth

  • 1 tablespoon apple cider vinegar

  • 1 medium onion, chopped

  • 1 head of garlic, cut in half horizontally or cloves peeled

  • 2 carrots, peeled and chopped

  • 2 celery stalks, chopped

  • 3 tablespoons tomato paste

  • 1/4 cup guava paste

  • 1 teaspoon fresh ground black pepper

  • 1 teaspoon ancho chili powder

  • 1/4 teaspoon cayenne pepper

Method

  1. Preheat oven to 375F.

  2. Generously season short ribs with salt.

  3. Heat vegetable oil in a large Dutch oven to high heat. Sear short ribs for 5 minutes on each side or until dark brown.

  4. Add remaining ingredients and stir to combine. Bring mixture to a rolling boil. Once boiled reduce the heat and cook for 15 minutes covered with lid.

  5. Place Dutch oven in the oven and bake for 2 hours or until meat is tender.

  6. Place Dutch oven back on the stove top and remove lid. Remove any chunky bits with a slotted spoon and discard. Simmer for an additional 10 to 15 minutes to reduce cooking liquid. Add additional salt as needed.

Easter Lemon Pistachio Scones with Whipped Honey Ricotta by Craig Montague

scones-5.jpg

Happy Easter! Wake your family up to the smell of scones baking in the morning. The air will be filled with hints of bright lemon and nutty pistachios. This combination is divine.  These scones are slightly sweeten with brown sugar and they will complement any savory item you have on your breakfast plate. If you love the dazzling green hues of the pistachios flecked with purple, then these scones should be at your table Easter Sunday!

Now I  understand that nuts are expensive, and pistachios are definitely expensive, but if there wasn’t another time to get them, then this would be the time. I found the pistachios at my local bodega selling for $10 per pound. I grabbed a little more than a handful for a total of $3. It would be best to buy the nuts unsalted and in the shells. They are fresher if they are bought in the shells. It will take a little extra prep time to dig them out, but it is worth it.

scones-2.jpg
scones-3.jpg

If you have only had ricotta in your lasagna, this sweetened version will be a pleasant surprise. It complements the scones so well. Neither are overly sweet. They both have the perfect amount, so you can eat more than one scone without feeling guilty. Drizzle the scones with honey, if you have a sweet tooth for an extra punch of delight!

scones-6.jpg

Easter Lemon Pistachio Scone with Whipped Honey Ricotta

Recipe Type: intermediate

Cuisine: American

Author: seasoningbottle

Prep time: 20 mins

Cook time: 20 mins

Total time: 40 mins

Serves: 8

This is the perfect scone recipe for Easter breakfast and brunch!

Ingredients

  • 2 cups all purpose flour, with extra for rolling

  • 6 tablespoons cold butter

  • 1 tablespoon baking powder

  • 4 tablespoons brown sugar

  • 1/2 cup chopped pistachios

  • zest of 1 lemon

  • 1/2 teaspoon salt

  • 1 teaspoon vanilla extract

  • 1 cup heavy cream + 1 tablespoon

  • 2 tablespoons honey

  • 1 cup whole milk ricotta cheese

Instructions

  1. Preheat oven to 400F.

  2. In a large mixing bowl combine flour, baking powder, brown sugar, and salt.

  3. Cut cold butter into medium sized chunks and add to flour. With your hands break up the butter into the flour, creating small pebbles of flour and butter.

  4. Add the lemon zest, pistachios, vanilla, and cream to the flour mixture to form your dough. Be sure not to over work the dough. If you find it not coming together, add small amounts of cream, 1 teaspoon at a time, as needed.

  5. On a clean surface, dust with flour and roll dough into a ball.

  6. With your fingers, or if you have a rolling pin, spread dough to about 1/2 inch thick.

  7. Use a pizza cutter to cut dough into slice like shape. Don’t worry if the edges are a little jagged.

  8. Place scones on an ungreased cookie sheet and bake for 18-20 minutes until golden brown.

  9. Remove from oven once baked and allow to cool.

  10. In a medium mixing bowl combine ricotta cheese, honey, and cream and blend together with a mixer on medium speed until it becomes whipped and airy.

  11. Serve whipped ricotta with scones and enjoy!